removal of the black to dark brown oxidation layer after firing of copper clay
Peparation before firing the copperclay
After designing and drying, the preliminary work begins, without which, as with all other metal clays, a high-gloss surface can only be achieved with great difficulty and with even more diligence. Polish small bumps and rough spots from the jewellery surface. Start with the abrasive papers, such as a P 240 wet or dry sanding paper, or a self-adhesive, similar-strength sanding paper. And work on the two or three sanding papers and the three common abrasive sponges super fine, ultrafine, microfine towards an almost glossy surface already at the unfired copper metal clay.
But beware, the unfired Metal Clay modelling clay is very fragile and may breaks easily if not handled with care!
Out of the hot kiln into cold water
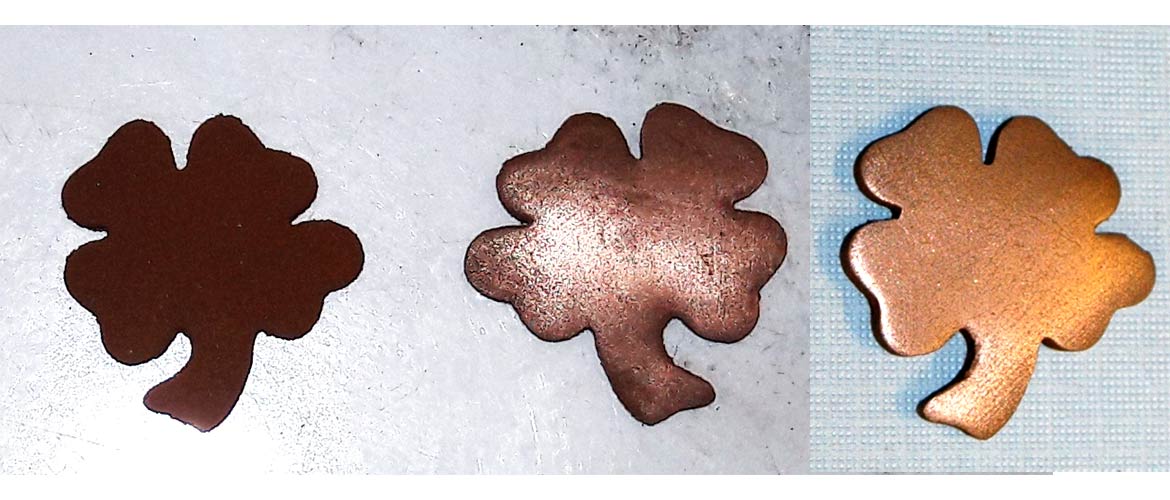
Out of the kiln or after torch firing copperclay has a dark brown to black surface. Now you should put your copper clay jewellery without gems, glass or porcelain into ice-cold water just out of the kiln. For jewellery made of copper clay with these components, please skip this point!
Prepare a container of very cold, better ice-cold water. Then take your copper parts out of the hot kiln and immediately throw them into the cold water. But beware: This action produces hot splashes of water and steam. Protect your skin and eyes from possible burns! With a loud hiss, large and small chunks of the black oxidation layer will now detach from your copper clay object.
Naturall, but efffective pickling bath
if you are lucky, quenching has released the scale and you can start sanding and polishing your copper jewellery immediately. But often you need a second step: the bath in acid. To do this, use citric acid dissolved in warm water from your household material or vinegar essence with salt.
This process of dissolving the oxidation layer takes time. Time and heat. Ideally, place the copper parts in an acid bath that will keep you warm on a small / medium cooking plate. Over time, the parts of the scale layer dissolve and the water changes color.
For copper jewellery with gemstones, glass and porcelain, please skip this step, too. When using gemstones, we therefore recommend to fire in activated carbon.
Please also note the manufacturer’s safety instructions and above all protect your eyes and skin from splashes of acid!
The copper clay is free from the black oxidation layer
The comparison shows that quenching and (in this case) zirconic acid have done a good job. With the flat metal clay copper part, no remains of the black oxidation layer can be seen. Even with the other, not flat copper clay parts only minimal remnants of the black coating can be seen, which can now be easily removed.
All the following steps are more or less the same as working with Silverclay. The biggest difference is the hardness of the copper clays. Because of this, the process takes a bit longer to achieve a high gloss finish. And you may need to use more different sanding papers and sanding sponges.
Grinding and polishing: manual or mechanical support
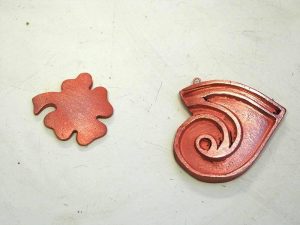
Now the last step: Once the oxidation layer has dissolved after quenching and pickling bath in citronic acid, the “normal fine work” of grinding and polishing of metal clay begins. And just as before firing, the copper part goes through all the steps of sanding with the various abrasive papers and sponges. Of course you can also use a small grinder here, if available. But without manual work, however, it will not end with an mirror-finished surfaces. They machines often do not reach into every corner of the copper part.
The goal: a piece of jewellery made of copper clay with a high-gloss surface even without activated carbon
If you’ve gone through all these steps with your Copper Metal Clay jewellery, you’ve made it: you’ve achieved Copper Clay with a high gloss surface without using activated carbon. Congratulations! And even if you opt for a matte or even partially patina surface for your copper clay: With our tips you have the choice now!